
by Texas Homesteader ~
*contains affiliate link
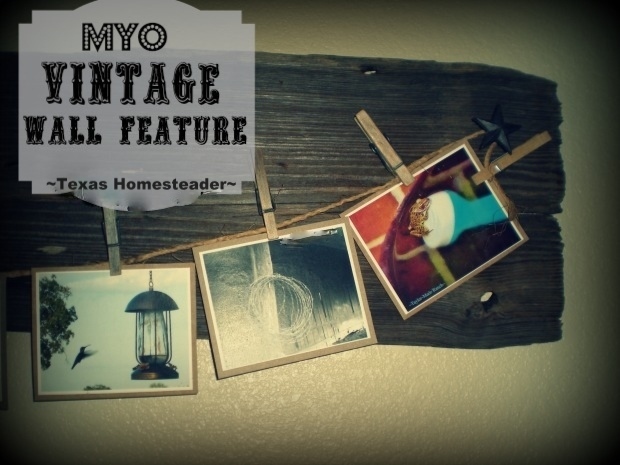
I used reclaimed aged wood from our old 1880’s barn, vintage clothespins and my favorite Homestead photos to produce a wall photo feature we love!
(Note: Some links in this post will take you to other related articles for further information. But links preceded with * are affiliate links. If you click and buy something I could receive a tiny commission.)
I love rustic country-chic decorating style. We still have some old barn wood from when we refurbished our Old 1880’s Barn.

So we’ve been using it as we revamp our guest bedroom. We’d already made a headboard with some of the wood.
But I’d like to make a wall feature as well with some of that rustic reclaimed barn wood to display some Homestead photos.
Using Reclaimed Wood In Décor
Last week I shared with you the headboard that RancherMan & I made from repurposed barn wood pulled from our 1880’s barn when it was refurbished a few years ago. I absolutely LOVE the way it turned out!

But now what to do with that wall? RancherMan & I don’t like much visual clutter so I was in a quandary.
Do we just leave the wall blank? Well, maybe, but I think it looks a little TOO bare. What to do…
Then I remembered a great piece of old aged wood that RancherMan had to cut off the original boards we were using for the headboard because it was split.
But I loved the split. And the ridges. And the knot-holes. All the rustic ruggedness of it!
I thought it was a beautiful piece of aged wood. So I asked him to save it for me. My mind was spinning on ideas to make a meaningful pictorial wall feature.
I’m Not Particularly ‘Artsy’
Now there are lots of artistic people in my family. MOST members of my family actually!
But the artsy tendencies skipped me for some reason. Oh I can usually plink something out if I can see a picture of it first and go verrrry sloooowly.
But I’m not good at actually picturing a project in my mind and seeing it through to the finish and having it turn out even remotely the way I originally envisioned it!
I’m also the eternal optimist. So I jumped in with both feet anyway. I started by picking out several pictures that I had taken around our homestead over the years & contacted a local printer in town.

Bada-bing, bada-BOOM for a whopping $1.29 and in about 24 hours time they reproduced several full-color pictures for me. Gotta love living in a small town!
Mounting the Photos
I cut out each photo with my handy-dandy *photo trimmer![]() and set them all aside. But these prints were printed on card stock. For what I had in mind I needed them to be a little more sturdy. Hummm…
and set them all aside. But these prints were printed on card stock. For what I had in mind I needed them to be a little more sturdy. Hummm…
I KNOW! I’ll cut out pieces of cardboard and mount the pictures to them, almost like matting. But where to find the cardboard for the mats?
I started looking around the house for colors, textures & thicknesses I wanted and found the perfect thing.
Use Whatcha Got For Photo Mats!
I disassembled the packaging from a 12-pk case of cola and voila – that cardboard was the color I wanted and the thickness I needed. (say it with me folks – my motto? USE WHAT YA GOT! LOL)
Using one of my prints as a template I cut out appropriate-sized squares of cardboard for my mat. Yeah, I like that! So far, so good.
Then it was simply a matter of a few squiggly lines of glue on the back of the pictures, attach the mat and use two of my heaviest books to press the pictures to the mats for awhile.
Ironically, both heavy books I used were volumes of Amy Dacyczyn’s *Tightwad Gazette![]() – they’re faves of mine.
– they’re faves of mine.

You Tightwad Gazette lovers know what I mean when I say that I think Amy would be so proud of this project!
How To Further Age Old Barnwood
Now that the pictures are cut out and glued to their mats I turned my attention to that old barn wood board.
Sigh… What a beautiful piece of wood. So interestingly ridged. Such perfect patina. So beautiful. And since it came from my own old barn so meaningful to me.
But being artsy can be harsh sometimes. So I pulled out the hammer & hacked up the smoothly-cut edge with the claw of the hammer so it would have a more rugged appearance. LOL
Then I hammered a couple of star-headed nails on each end of the board, strung & wrapped some jute-like baling twine and attached some vintage clothes pins so I could tell what kind of spacing I’d need and how many photos I could use.
Hanging A Wooden Photo Board On The Wall
Now this wall-feature board is going to be hanging on the wall. In our guest room. OVER THE HEADS OF OUR SLEEPING GUESTS!!
There’s no better way to be declared the worst hostess ever than maiming your guests in their sleep during their overnight stay at your hacienda…
So I wanted to make absolutely sure it was secure when I hung it on the wall. I asked RancherMan to put some heavy picture-hanging wire on the back of the wood, using screws to securely anchor it in place.
Adding Photos To My Barn Wood Photo Board
Then when all was finally ready I hung the wood on the wall and placed my favorite newly-printed photos on it using those lovely aged vintage clothespins.
I had more pictures printed than I actually needed so I’ll be able to change them out periodically if I like. And that certainly works for me since I picked out the photos that I loved the most!
Now that my little work of art is finally finished I take a step back to see how she looks…
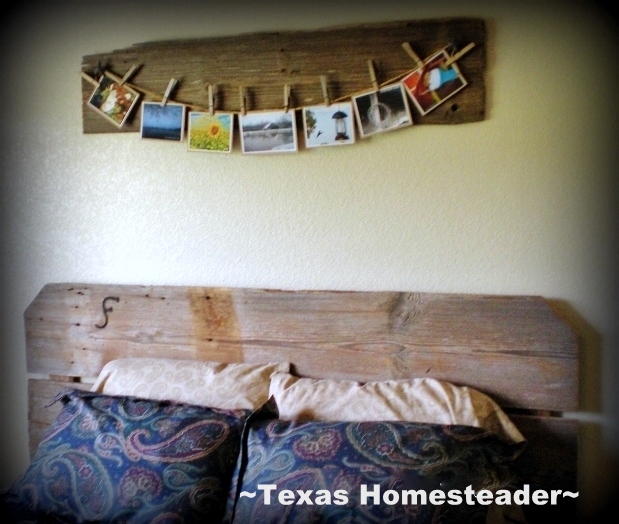
I love this wall feature, and it came out exactly as I hoped it would. (fist pump!)
Because I’m distress-painting the furniture in this room with white paint, I’m thinking about maybe milk-washing this old piece of wood of my wall feature to tie the aged barn wood patina of the headboard with the distressed white of the other furniture.
But then again I may leave it alone, it looks great like it is. Decisions, decisions…
Whaddya think?
~TxH~
This post categorized in 
Tagged in ![]()
![]()
![]()
![]()
![]()
Our Favorite Crafts & Projects
- Make Your Own Clothespin Apron
- Cute Flannel Pillows Using Flannel Shirts
- Rustic Reclaimed Barn Wood Headboard
- Old Barnwood Wall Photo Feature
- Rustic Barnwood Mirror
- Make An All-Natural Air Freshener
- Painting Rocks To Look Like Strawberries
- MYO Beeswax Candles
- Cute Santa Sleigh Made With Candy
- A Denim Dish Carrier Using Worn Jeans
- Fun, Customized Cornhole Game
- MYO Backyard Tossing-Game Bags
- Cute Cloth Gingham Napkins For $1
- Arrowhead Cross Collage In Shadow Box Frame
- How To Paint A Texas Flag Gate
- Pretty Wax-Dipped Pinecone Fire Starters
- How To Make A Dragonfly Rock Garden Accent
…and many MORE!
See All Crafts

C’mon by & sit a spell! Come hang out at our Facebook Page. It’s like sitting in a front porch rocker with a glass of cold iced tea – lots of good folks sharing! You can also follow along on Pinterest, Twitter or Instagram.
If you’d like to receive an email each time a new blog post goes live it’s EASY to
Subscribe to our blog!
* A word about our Affiliate Link – We are currently enrolled as an Amazon Affiliate. Occasionally I will insert an affiliate link into one of my posts if I think it may be of interest to you. Both of the items linked in this are things I use and love! If you click on any of my affiliate links and buy something (almost anything, not just what was linked) I get a small referral percentage from Amazon. But here’s the really important part – the price you pay for your items is UNCHANGED.
When you buy something through the affiliate link it’s a great way to support this blog without anything coming out of your pocket. So please click often!
You did such a great job with this! It turned out beautifully. Thanks for posting on the #WasteLessWednesday blog hop!
Love it! I love using reclaimed wood for projects and I love me some Tightwad Gazette! Thanks for sharing!
I love this! The rustic appearance adds so much charm, and so thrifty too! Well done, thanks for linking up to Merry Monday, I can’t wait to see next week’s!
Oh that’s really cute, Tammy! I love it. We have plenty of aged wood around here that would be great for this project. We are not into visual clutter either—I used to be, but it was overwhelming after a while. I would love to do this project for a specific higher-up blank spot in my kitchen. It would look great there, and not clutter things up at all.Visiting from Good Morning Mondays.
Kristi@Stone Family Farmstead
Such a cute idea and I love that it’s easy and inexpensive! Thanks for sharing your awesome ideas at Share The Wealth Sunday!
xoxo
Lisa
I love this! I made a similar one years ago that I use all the time. Thanks for sharing it with us.
Visiting from Our Simple Homestead blog hop.
Oh wow!! I just love this! I collect all kinds of driftwood pieces from the beach -and I need a headboard -and I take lots and lots of pictures! I am definitely going to do this! thanks for sharing this great idea.
I love the look of your spare bedroom. The headboard looks great the way it is, I wouldn’t do anything to it I couldn’t undo if I wanted to. And your picture board is great.
Diana
Fashionable homestead! Love this!
So cute! I did something similar with an old wooden frame and some chicken wire. I love utilizing old stuff to make something new!
I love this idea. I also think it would look good painted white and distressed. Maybe use a black cardstock as the backing for the pictures. Thanks for the inspiration!
It looks great. I think if you are leaving the wall that light color I would leave the wood alone. Super cute idea…where did you get the star nail heads? Those are so neat. Thanks for sharing on Merry Monday. Can’t wait to see the room all finished.
What a great idea! I like it just the way it is. Thanks so much for sharing at Simple Lives Thursday, this post really speaks to the heart of simple living. Hope to see you again this week!
A simple and easy way to re-purpose old beautiful wood:) Love it!
I received The Tightwad Gazette in the mail as a newsletter. I saved all the copies and kept them in a notebook. I poured over them constantly and loved them!
I have some photos that I’ve been trying to figure out what to do with and I believe you just gave me an idea. Thanks. I do have to say as a photographer I cringed a little when you used elmer’s glue on a photo (Not good for longevity). The natural wood look is amazing, it gives the images a nice “clean” backdrop.
LOL Rochelle, these are reproductions of my digital photos, reproduced on cardstock by a local printing company and the whole reproduction job cost less than $2. If the glue causes a problem down the road, $2 and 24-hours time will replace them. 🙂 Thanks for your compliment!
All three of Amy Dacyczyn’s books are on my bookshelf. They were like my second bible when my kids were growing up. Your wall art ties in so well with the headboard. You should be proud. There’s such a sense of satisfaction when you can take something that most people would relegate to the land fill and turn it into a useful and versatile piece. Nice go’in.
Loving this project, that piece of wood is gorgeous and looks great above the bed with your photographs.
Nice Job! And you said you are not artistic. Silly girl.
What a Beautiful and clever idea. Love that. Very nice; simple and easy project to do, plus you can change out the pictures whenever.
It goes so well with your headboard but I’m surprised that you didn’t use your branding iron and brand in your ranch’s emblem; ‘ Sunrises Forever.’
Enjoy the remainder of the day and have a wonderful evening.
What a simple beautiful idea. I think it is pretty just leaving it in its natural state…
That turned out so wonderful. I agree, Amy D. would think this project is the “Bee’s Knees”. I like te idea of white washing the wood to go with your farmhouse white distressed furniture…but no stress on you, right?
I salvaged a piece of fence wood from the back fence when it was bull dozed. I haven’t done anything with it yet…but I’m looking for idea!
Pat