
by Texas Homesteader ~
My bathroom window needs privacy covering but I wanted lots of natural light. So I added a beautiful lace window treatment directly to the glass itself. It’s easily completely removable too. So it’s a great option for those living in apartments or rented housing.

Small Window Needs Light Coverings
Although I love the light green-tea color we painted our guest bathroom, it does darken this small room a bit. Especially since there’s such a tiny window in this room offering the only natural light.
I’ve used my grandmother’s dresser scarf – embellished by her hand – as a sentimental valance window covering. It helps the window look finished while still allowing in as much light as possible.
But since it is a bathroom after-all, there needs to be more privacy than just a valance.
So to provide the privacy needed we’d added mini blinds to the window as well.
But I’ve always thought that the mini blinds made the window look a little “wah-wah-wah-waaaaaaaah!”

Since our guest bathroom is adorned with a pedestal sink & large vintage claw-foot tub, I love how this sentimental old vintage scarf maintains the old-time look I’m after. And I certainly don’t want anything added that will detract from that simple vintage look.
I wondered if there was a way to keep the old-time charm of the room & still offer both privacy as well as natural light. hummm….
Lace Window Treatment is Completely Reversible
Then I read an idea on Annabel Vita about using lace & a simple paste made of cornstarch and water to decoratively cover the window’s glass itself and make it opaque.
The beauty of this method is that it’s completely reversible. So it would work very well for people living in temporary accommodations such as apartments or rental houses.
I’m reading that if you ever want a clear window back, a sponge with hot water will dissolve the corn starch. Then you simply pull the lace off and clean the remaining residue off the window. It’s like the covering was never there in the first place!
I love the difference in the look of my window & light entering. No more ugly mini blinds but only pretty lace instead!

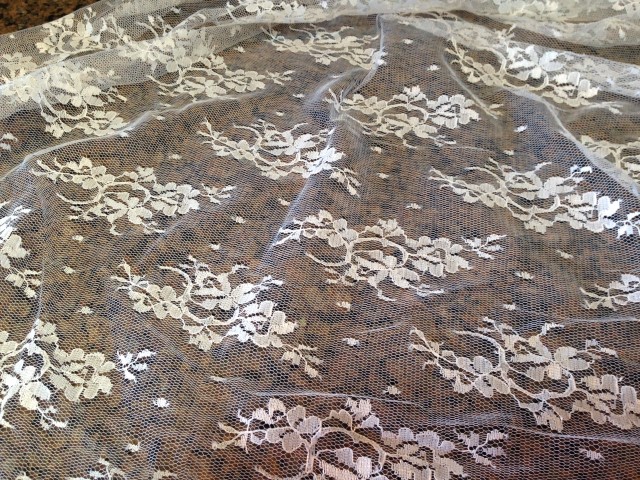
Finding The Right Lace For Window Treatment
Several weeks ago in preparation for today’s mission my aunt helped me search for the perfect lace. I wanted something very lightweight and with a subtle pattern.
I would have really liked to have found that lace as a window panel or wedding veil at a garage sale so I could have bought it used. Reusing existing lace instead of buying new would make my crunchy-green heart very happy.
But everything I saw was either too heavy or had way too much pattern. So to a fabric store we went.
And I found this bundle of loveliness. I knew it would be perfect for my project.
The quick-read version of this Window Glass Lace project:
Cut a template,
Cut the lace,
Mix up the cornstarch paste,
Slather it on window,
Attach lace,
Slather paste on outside of lace.
DONE.
(Editor’s note: No matter how handsome the cowboy who’s trying to convince you that you don’t need a template, that you can just cut the lace an inch larger than you need & trim down when it’s on the window – don’t listen. Really, just walk away. It doesn’t work. Eh-hem…)
Trimming The Lace
So I pulled out the lace and measured my window to make sure I had plenty of lace. I brought out a large paper feed sack to use for my window templates.
But my handsome RancherMan told me that was doing it the hard way. He suggested I just trim any excess once the lace dries.
“But, it’s not a solid material – it’s LACE.” I protested. “And I don’t think it will trim the same as you’re suggesting.” I continued.
(Que 15 minutes of back-n-forth dialogue of me offering up concerns
and him offering up counter-arguments.)
“Well,” I thought, “RancherMan is usually right. Maybe I am doing it the hard way. Maybe I really can just trim the excess afterward.” So I decided to give his way a go.
(please see above paragraph. Just. Say. No.) Trust me, your project will be much simplified if you first make a template out of paper, pin the lace to the template, cut the lace and go from there. ‘Nuff said – skip to the next step…
Making Lace Glue Using Cornstarch
Now that the lace is cut I make my cornstarch paste by adding 1 Tablespoon cornstarch to 1 Tablespoon cold water and stirring to blend it all in.
Then I placed 1 and a half cups of water in a microwave-safe bowl and heated it to boiling. Now I add my cornstarch mixture into the boiled water, stirring to thoroughly blend it. I’ll allow it to cool somewhat before attempting to work with it. The texture became much like a thin off-white colored glue.
Applying The Glue To The Glass
Now it’s show time! I take my lace pieces, my bowl of cornstarch paste and a soft-bristled paintbrush into the bathroom.
Using a paintbrush I slather my paste onto my clean windows in a random pattern. I think a random pattern keeps any lines or streaks from being prevalent in your finished look.
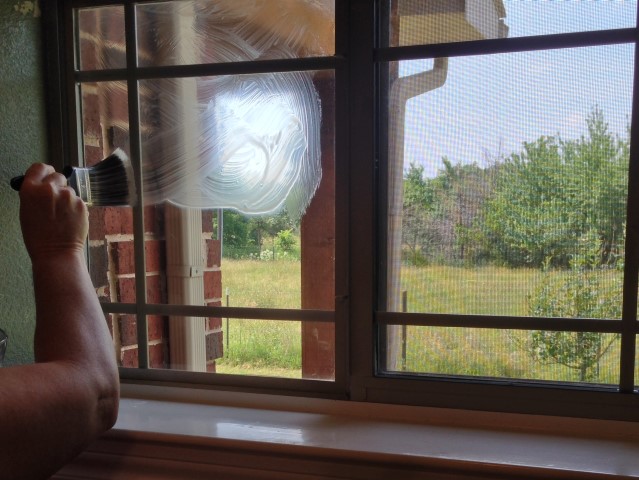
Applying The Lace
Then I position the lace on the window and press to attach it. Finally I take my paintbrush and dip it in the cornstarch paste again.
Finally I slather my cornstarch glue on the outside of the lace to seal it all in, again in a random pattern. PERFECT!
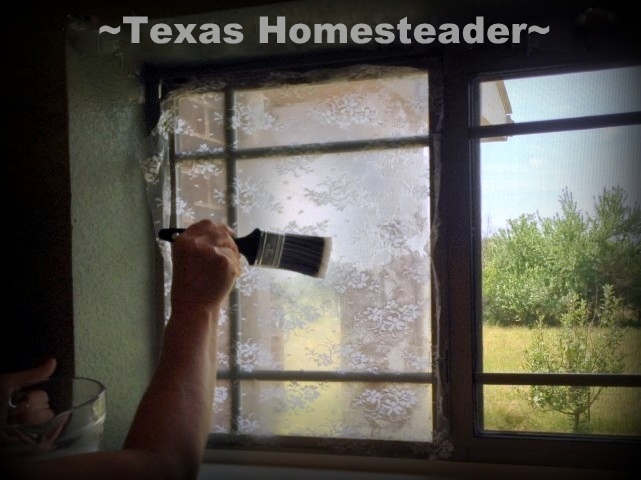
When the cornstarch dried I went in with another layer on top to more evenly cover the lace. It turned out perfectly.
Now all that’s left to complete m lace glass project is to trim the excess lace from the edges (eh hemm…) and I’m all done.
I absolutely love the way it looks. It solves all my bathroom-window problems:
It’s beautiful,
The lace lets in natural light,
Lace window treatment offers privacy,
It still maintains the old-time look I love.

Areas Where This Lace Glass Treatment Aren’t Ideal
I’m reading there are a few situations that aren’t ideal for this type of lace window treatment.
Situations such as a location where the lace can get splattered and need to be cleaned often such as over a sink.
And I’d think frequent heavy steam right next to the window might be a detriment to it as well.
So keep those conditions in mind when considering this lace window treatment.
Our guest bath clawfoot tub isn’t used very often, so we’ve never had an issue with steam. This lace window covering has been in place for several years and is still holding strong.
But of course the way I look at it is if you don’t like it, it’s easy-peasy to remove. All it takes is just a sponge and some hot water.
So you really can’t lose! Give it a try and let me know how you like it.
~TxH~
This post categorized in 
Tagged in ![]()
![]()
![]()
![]()
Our Favorite Crafts & Projects
- Make Your Own Clothespin Apron
- Cute Flannel Pillows Using Flannel Shirts
- Rustic Reclaimed Barn Wood Headboard
- Old Barnwood Wall Photo Feature
- Rustic Barnwood Mirror
- Make An All-Natural Air Freshener
- Painting Rocks To Look Like Strawberries
- MYO Beeswax Candles
- Cute Santa Sleigh Made With Candy
- A Denim Dish Carrier Using Worn Jeans
- MYO Backyard Tossing-Game Bags
- Cute Cloth Gingham Napkins For $1
- Arrowhead Cross Collage In Shadow Box Frame
- How To Paint A Texas Flag Gate
- Pretty Wax-Dipped Pinecone Fire Starters
…and many MORE!
See All Crafts

C’mon by & sit a spell! Come hang out at our Facebook Page. It’s like sitting in a front porch rocker with a glass of cold iced tea – lots of good folks sharing! You can also follow along on Pinterest, Twitter or Instagram.
If you’d like to receive an email each time a new blog post goes live it’s EASY to
Subscribe to our blog!
Hello Tammy,
Nicely written article about repurposing your grandmother’s lace for a privacy window treatment. Very Good Idea, and great little project for those who enjoy using something personal from family members we love. Nice that you would share this again from some years ago. I was wondering how it is holding up after these 5 years. The look was wonderful and it did keep the theme of old time.
I particularly enjoyed the part about ” Just. Say. No. “…. Being that I’m a man and we are not always right about things… enough said …lol.
If I were doing this, I might have starched them stiff first with an iron, as cutting them they might fray less and I probably would have used a razor knife and straight edge. You didn’t really say how you cut the lace in your article , so I was assuming you used scissors. How ever, I was thinking if starched first they would become stiff and easier to cut to window pane size, applying your corn starch paste to the window and then applying the lace with the fina top coat over that.
Just my idea of how I might approach this. No matter what I think this Idea was what I call a Super Special Repurpose , because you used something handed down to you and instead of it being folded in the dresser drawer out of sight . They were now visible all the time for our memory and serving a different function. Absolutely making out grandmothers Proud, and I’m sure she was.
Thanks for sharing this article again it’s totally an awesome repurpose. Pinned and will be sharing it on The World Repurposing and Upcycling and Discover Repurposing for sure.
Greg
LOL. Yeah, RancherMan’s almost always right about these things, but this time? Well let’s just say it’s good he’s so handsome! 🙂 But it all worked out well and we got everything cut to fit. And the laced glass panes are still holding up as beautifully as the day they were crafted. ~TxH~
Thank you so much for your response! I was curious because I have heard of people having issues with corn starch molding in the past (recently our community had a colour run fundraiser and the “colours” were corn starch based and went moldy before the event :o), but perhaps once it’s dry its fine? I am super excited to try this 🙂
I would absolutely love to try this! I was wondering if mold would be a concern for this?
I didn’t have any trouble with mold Chelsy, but mold in my bathroom isn’t typically a problem anyway. I suppose it could be like any other surface in your bathroom if mold is typically a problem in that locale, perhaps lessened with adequate ventilation or use of an exhaust fan? BUT, it’s completely reversible so if it did end up being a problem down the road it can be easily removed.
I love this idea!! I have a bathroom window that is right on my back deck!!
Wow, NEVER would have thought of that! What a great option for renters. Thanks for sharing with Simply Natural Saturdays.
I really wish I’d known about this when we had those dang sidelights next to our door when we lived in the city. I hated the tension curtain rods/sheers window treatment we were stuck with back then.
What a beautiful idea. I didn’t know this was possible. I think this looks so pretty instead of just a lace curtain or those fuzzy windows we sometimes have. I am hosting a link party which is called Sweet Inspiration. Now if anything is sweet it is this idea. Come and join us, we run Friday till Tuesday.
I never would have thought to add lace to a window, but this adds a great touch of design to any room. What a fantastic idea that’s simple and fun to add just the right accent to home decor!
Wow. I would have never thought about this! I love the way yours turned out. I’m wishing I had a window to do this to, but sadly all my windows are still a little too public (and facing an elementary school!) to risk the lace being a little too see through. Thanks for posting this on the #sustainablesunday linkup!
I can’t see anything through the lace Katy, even with my face pressed very closely since it’s painted on with a very opaque mixture of cornstarch & water. But I understand your reservation.
I love this and want to give it a try. Thank you!
I went ahead and pinned this, so that I can come back after I purchase a bigger container of cornstarch.
Oh, and lace . . . this is so pretty, thanks again 🙂
Great idea!
It came out awesome!
Thanks for sharing. 🙂
Wow, I had NO IDEA cornstarch could do that!! I really like your tip about painting in a random pattern to keep brushstrokes and lines less noticeable…..genius!! Thanks so much for sharing this with us at Merry Monday! We hope you’ll join us again this week! 🙂
I love this look and like the fact is reversible. I’m trying to figure out which window I can do this in!
Hi! I love this idea . . . . thanks for sharing. Now I’m thinking of places where we could try this technique – it turned out beautiful. And thanks for the warning about using a template ;o) I’m stopping by from the Thursday Favorite Things Blog Hop. So glad you could join the weekly party and hope to see you again this coming week. Nina @ Vintage Mama’s Cottage
Oh my goodness, what a creative idea and looks adorable!
Jennifer
Thanks for the Reader’s Digest version, I’ll remember that about cowboys 😉
But seriously, thanks for sharing your idea (found it over at Front Porch Friday), I’ll pin it to come back to later. 🙂
I hadn’t thought of this for glass and privacy; but I’ve seen it used with vintage sheets on walls! Especially in a rental or temporary situation.
I say good job!
And thanks for the cowboy tips 😉
This is so genius. I’ve been looking for something like this for forever. Thanks for posting. Hello from Mostly Homemade Mondays.
Give it a try Melissa, I’m beyond thrilled with the way it turned out in our home. ~TxH~
What a great idea (although I would have trouble not being ABLE to see out the window if I wanted to. 🙂 This post is great… and I LOVE the helpful hints about the handsome cowboy!!! I have learned some of my own from my man too. 🙂 I really like how your bathroom looks unified and not like it is unsure of what time period to be in now. 🙂
Of course you could slide the window open to peek out if need be – there’d be no mini blinds in the way so t’would be easy to do. In our case the window’s over our tub so there’s not much need to look out that window in the first place. It worked PERFECT for us. ~TxH~
I have 2 side windows by my front door that I think this will work wonderfully. I am going to start looking for lace at the many Estate Sales I go to. Thanks for the tip!
Oh man, at a previous home we had those two side lights on either side of our front door too, it would have been great there. I hated the tension-rod sheers that we had to use there. Let us know how you like it!! ~TxH~